
Part 1 : http://oculusdrifter.blogspot.com/2014/06/amazing-ue4-tutorials.html
adjust light source rotation:
129.4, -84.37, 90
slide further ceiling rock further along x axis: 383630
slide closer ceiling rock further along x axis: 179640
build lighting (that darkens things)
return to light source via scene outliner.
> we are concerned with lighting of statue
> adjust light source angle to 3
select statue
> override lightmass resolution from 64 to 512
build lighting
go to world settings:
lightmass:lightmass settings
> use ambient occlusion
> environment color: gold (H=35,S=.244,V=.79)
return to light source via scene outliner.
> rotate in bit in multiple axis
build lighting
He rearranges the ceiling tiles to have light fall on the statue so the head is lit the way he wants it

go to modes:placement:volumes
> lightmass importance volume
> expand this just around the scene (not the walls or statue)
> he switched to geometry editing mode
create a copy of the left rock wall in the scene
> move & rotate it so it covers the back (behind camera)
create another copy and place it on the right so that it is barely with the bricks and touches back
create another copy and rotate & place it so so it becomes the ceiling of our scene
> I gauged the final position based on how light fell onto the floor of the scene
> I also made it so you couldn't see it in the camera

back to scene object adjustment (whew!)
adjust 4 of the rocks on the left
add Rocks/SM_Cave_Rock_Small_01b on the left
He starts digging through colors to paint onto the floor again
> he settles on H300,S1,V1
> he paints portions of the left side with this.
> this has a distorting effect on the land (sinking it a bit)
FLOOR COLORING REVIEW:
channels RGB (no alpha)
> BLUE = pebbles
> GREEN = pebbles water
> YELLOW = stone water
> PURPLE(RB) = stone
He wants stone floor near the bricks and pebbles near the water
Here is how the paint is put onto the floor:

@ 2:56:24
------------------------------------------------
Add SM_Cave_Rock_Large_01b to left of scene behind furthest bricks
copy to the back right side of scene
Add point lights by back rocks
copy ceiling rock and rotate it so it is on the left side of scene
> remove a brick it overlaps
copy SM_Cave_Rock_Large_01b_2 from left of scene onto floor
> click on floor and select "paste here"
> scale to 200 on position to the back left of the statue
> copy and place right of the statue (rotate 180 degrees for symmetry)
rotate the statue back a bit and bring it forward so the face is in the light
> this looks really good
He starts replacing the large walls with lots of rotated copies of SM_Cave_Rock_Large_01b_2
> I rebuilt lighting to see if this was important. It is. You can see them so I need to follow along...
@ 3:07:14
------------------------------------------------
rock:
pos = 290225,-114090,-94560
rot = 78.8,-7.56,-97.1
sca = 200,150,200
@ 3:16:15
------------------------------------------------

Bring the large left wall back
Add another ceiling rock so that it doesn't shade the scene and rebuild lighting
Back to scene with slower movement speed
Add SM_Cave_Rock_Med_01a
> scale 2:2:2
> put rock so it it is at the back left covering the edge
> create a 180 degree rotate copy on right side
adjust rock above statue (not sure why)
create another ceiling rock copy moved behind where scene is
> keep light that falls onto scene floor in-tact
Time for another comparison check (his on top, mine on bottom)

I used his image to adjust a few of my meshes to better match his layout.
create a copy of large left wall, rotate 90 degrees and block behind scene
copy left rock in scene (SM_Cave_Rock_Large_01a) wall to right side
> scale: 1:.75:1
> position to fill gap on right
> create a copy higher. rotate and adjust position a bit
adjust several bricks
> he makes a copy of one on the left and swaps it out for SM_Cave_Brick_01c
> he then uses a scale of -5 on the z axis which inverts the mesh. COOL TRICK
> scale : 4.5:4.5:-4.5
copy far left scene rock twice rotating it to make a visible arch
adjust the beam (and brick supporting it on right) to better show off the arch
------------------------------------------------
@ 3:48:18
select light source
> indirect lighting intensity : .1
> this makes the interior of the scene slightly darker
hide sprites and move bricks around
copy rock from back left into arch to smooth it out
I adjusted my scene a lot to match his lighting as much as possible
> He wants v-shaped lighting over the stream

Adding foliage:
Meshes/Foliage/SM_Cave_Ivy_01
> scale 3:3:3
> hang off beam on right side
world settings:
> environment color: H:220, S:.503, V:.792
plug up lower hole in back of scene with rotated copy of back wall
adjust a few bricks on the left
add another ceiling beam on left side.
add 2 more vertical beams, one embedded on each end of the scene
@ 4:21:12 : I tested in in the Rift. It looks great.
------------------------------------------------
He didn't like the environment color and changed it:
H:37,S:.31,V:.715
Override the lightmap resolution on everything to 512
> select all static mesh only
> that slowed down build time significantly (10 secs to 5 mins)
> I put it back to 64. It makes a difference in the end but not
significant enough during level construction to justify build time
> he continues to construct the level while lighting build going on via un-lit mode
Add SM_Cave_Grass_01a (sc 3) on far left
Add SM_Cave_Vine_01c (sc 2) along arch (pivot point on vine is bad)
> adds a copy of it and does a transform along x axis (I think he wanted y)
> not having the rotation point in a good spot TOTALLY sucks.
> actually got the copy to hook over the beam. I'm keeping that!
4:49:26 : It gets tough here.
He copies a few elements from the cave demo
> He seems to copy a lot more than 3 items.
> I copied SM_Cave_Rock_Large_01b52, SM_ROC_TalonStruts_TopFrontA04278, M_Mod_WaterFlow_DCL_Master_2
World Settings:
> Environment Intensity : 1 -> .25
Adds Rocks/SM_Cave_Rock_Slate_01a
> quickly uses SM_Cave_Rock_Large_01b52 to get meterial (mag glass) and apply it to the new row (via arrow)
> leaves that hanging in middle of scene
adds a snow drift (01b) and changes material to same rock material above
> scale: .5 & place on right behind brick on floor
adds a snow drift (01a) and changes material to same rock material above
> scale: .75 & place on left along edge of bricks, half buried in floor
> add another and leave in middle
move right snow drive towards camera
paint all snow drifts blue (green mossy rock)
rotate second 01a snow drift on left in the rocks at the end (that looks good)
(I'm a bit picky about not having any part of the drift floating above the surface.)
make a copy on the right side
rescale grass on right to 5 & move into moss rock on left
.... I think light in main area has been removed from the scene. His is much darker than mine ...
> dropping the intensity on it from 5000 to 2000 for now
I adjusted the ceiling a bit to add another small area of light on front left
Add 2 bricks on the right
@ 5:25:01

------------------------------------------------
Add a post process volume (I already have one set to unbound
> I think unreal blew up on him
> enable all depth of field values
> Method : Gaussian
> Focal Distance : 0
> Focal Region : 1800
> Near Transition: 0
> Scale : 1
> Near Blur Size : 0
> Far Blur Size : .1
That looks pretty good in the Rift. I think it needs some adjustment, but very nice.
rotate a few bricks on the left.
add a brick copy on the right (sc 2)
move rock on left and place grass next to it (sc 4)
> rescale rock .75:1:.75
create copy of rock in front of it (1.25:1:.75)
copy rock 2 times, make smaller and position along stream
copy moss rock/snow-drift on left twice and position along stream on each side by rocks
add another rock on left along stream
copy mossy rock on left bricks to right, flip y and position along right bricks
add a rock and grass on right
@ 6:09:09

I think he moved another view of the scene onto a second monitor
Add a point light in center and slide to lit area of stream
> color: H33,S.383,V1
> intensity: 500
> show all advanced details (eyeball in upper right of detail pane)
> use inverse squared fall off : unchecked (it got bright!): I like that look
> change intensity to .2
> attentuation radius: 1024
> I think he is changing work detail lighting settings off screen
> The effect of all this is very subtle: a slight orange tint to lit stream area
> I guess he wants to enhance the lit area a bit
drag a sphere reflection capture into area
> above stream near shield
> influence radius = 512
copy that and move towards end of stream outside radius of first one
copy end of stream one and move it to upper left area
> influence radius = 768 (encompasses prior one)
@ 6:33:15
shrink the far right upper brick a bit
adjust the original light:
> color = blue
> intensity = 500
copy that and move it to the opening on the far left
At this point I have 2 overlapping lights (red Xs on them)
> copy again onto right side
Jist:
orange tint in lit areas
blue tint in dark areas
I added 2 white point lights to lighten up the cave to look like his
Tried in Rift again.
> it looks good but the frame rate is bad.
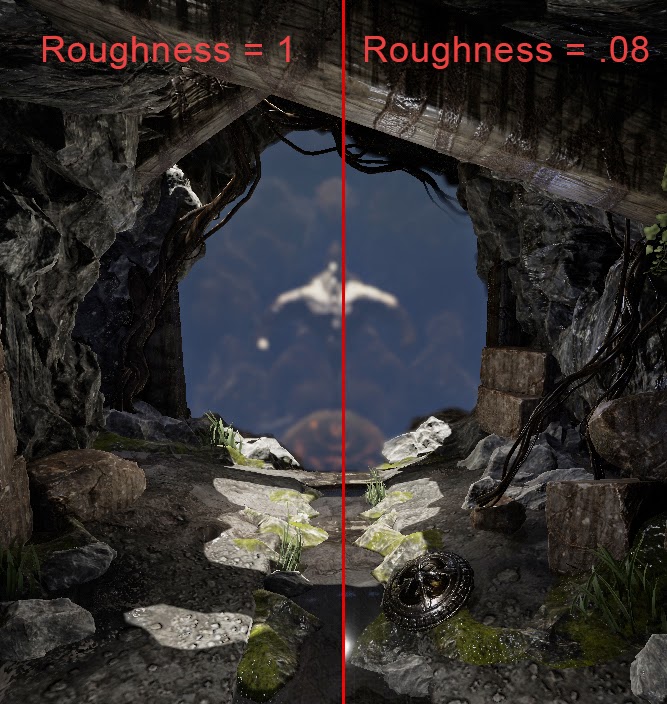
> reflections of light on the later is annoying too.
> roughness of 1 removes this
------------------------------------------------
Add SM_Cave_Rock_Large_01b to left of scene behind furthest bricks
copy to the back right side of scene
Add point lights by back rocks
copy ceiling rock and rotate it so it is on the left side of scene
> remove a brick it overlaps
copy SM_Cave_Rock_Large_01b_2 from left of scene onto floor
> click on floor and select "paste here"
> scale to 200 on position to the back left of the statue
> copy and place right of the statue (rotate 180 degrees for symmetry)
rotate the statue back a bit and bring it forward so the face is in the light
> this looks really good
He starts replacing the large walls with lots of rotated copies of SM_Cave_Rock_Large_01b_2
> I rebuilt lighting to see if this was important. It is. You can see them so I need to follow along...
@ 3:07:14
------------------------------------------------
rock:
pos = 290225,-114090,-94560
rot = 78.8,-7.56,-97.1
sca = 200,150,200
@ 3:16:15
------------------------------------------------
Bring the large left wall back
Add another ceiling rock so that it doesn't shade the scene and rebuild lighting
Back to scene with slower movement speed
Add SM_Cave_Rock_Med_01a
> scale 2:2:2
> put rock so it it is at the back left covering the edge
> create a 180 degree rotate copy on right side
adjust rock above statue (not sure why)
create another ceiling rock copy moved behind where scene is
> keep light that falls onto scene floor in-tact
Time for another comparison check (his on top, mine on bottom)
I used his image to adjust a few of my meshes to better match his layout.
create a copy of large left wall, rotate 90 degrees and block behind scene
copy left rock in scene (SM_Cave_Rock_Large_01a) wall to right side
> scale: 1:.75:1
> position to fill gap on right
> create a copy higher. rotate and adjust position a bit
adjust several bricks
> he makes a copy of one on the left and swaps it out for SM_Cave_Brick_01c
> he then uses a scale of -5 on the z axis which inverts the mesh. COOL TRICK
> scale : 4.5:4.5:-4.5
copy far left scene rock twice rotating it to make a visible arch
adjust the beam (and brick supporting it on right) to better show off the arch
------------------------------------------------
@ 3:48:18
select light source
> indirect lighting intensity : .1
> this makes the interior of the scene slightly darker
hide sprites and move bricks around
copy rock from back left into arch to smooth it out
I adjusted my scene a lot to match his lighting as much as possible
> He wants v-shaped lighting over the stream
Adding foliage:
Meshes/Foliage/SM_Cave_Ivy_01
> scale 3:3:3
> hang off beam on right side
world settings:
> environment color: H:220, S:.503, V:.792
plug up lower hole in back of scene with rotated copy of back wall
adjust a few bricks on the left
add another ceiling beam on left side.
add 2 more vertical beams, one embedded on each end of the scene
@ 4:21:12 : I tested in in the Rift. It looks great.

------------------------------------------------
He didn't like the environment color and changed it:
H:37,S:.31,V:.715
Override the lightmap resolution on everything to 512
> select all static mesh only
> that slowed down build time significantly (10 secs to 5 mins)
> I put it back to 64. It makes a difference in the end but not
significant enough during level construction to justify build time
> he continues to construct the level while lighting build going on via un-lit mode
Add SM_Cave_Grass_01a (sc 3) on far left
Add SM_Cave_Vine_01c (sc 2) along arch (pivot point on vine is bad)
> adds a copy of it and does a transform along x axis (I think he wanted y)
> not having the rotation point in a good spot TOTALLY sucks.
> actually got the copy to hook over the beam. I'm keeping that!
4:49:26 : It gets tough here.
He copies a few elements from the cave demo
> He seems to copy a lot more than 3 items.
> I copied SM_Cave_Rock_Large_01b52, SM_ROC_TalonStruts_TopFrontA04278, M_Mod_WaterFlow_DCL_Master_2
World Settings:
> Environment Intensity : 1 -> .25
Adds Rocks/SM_Cave_Rock_Slate_01a
> quickly uses SM_Cave_Rock_Large_01b52 to get meterial (mag glass) and apply it to the new row (via arrow)
> leaves that hanging in middle of scene
adds a snow drift (01b) and changes material to same rock material above
> scale: .5 & place on right behind brick on floor
adds a snow drift (01a) and changes material to same rock material above
> scale: .75 & place on left along edge of bricks, half buried in floor
> add another and leave in middle
move right snow drive towards camera
paint all snow drifts blue (green mossy rock)
rotate second 01a snow drift on left in the rocks at the end (that looks good)
(I'm a bit picky about not having any part of the drift floating above the surface.)
make a copy on the right side
rescale grass on right to 5 & move into moss rock on left
.... I think light in main area has been removed from the scene. His is much darker than mine ...
> dropping the intensity on it from 5000 to 2000 for now
I adjusted the ceiling a bit to add another small area of light on front left
Add 2 bricks on the right
@ 5:25:01
------------------------------------------------
6/23/2014------------------------------------------------
Add a post process volume (I already have one set to unbound
> I think unreal blew up on him
> enable all depth of field values
> Method : Gaussian
> Focal Distance : 0
> Focal Region : 1800
> Near Transition: 0
> Scale : 1
> Near Blur Size : 0
> Far Blur Size : .1
That looks pretty good in the Rift. I think it needs some adjustment, but very nice.
rotate a few bricks on the left.
add a brick copy on the right (sc 2)
move rock on left and place grass next to it (sc 4)
> rescale rock .75:1:.75
create copy of rock in front of it (1.25:1:.75)
copy rock 2 times, make smaller and position along stream
copy moss rock/snow-drift on left twice and position along stream on each side by rocks
add another rock on left along stream
copy mossy rock on left bricks to right, flip y and position along right bricks
add a rock and grass on right
@ 6:09:09
add war spoils shield on right of river (sc 2)
> add another moss rock section by it and a rock in front of itI think he moved another view of the scene onto a second monitor
Add a point light in center and slide to lit area of stream
> color: H33,S.383,V1
> intensity: 500
> show all advanced details (eyeball in upper right of detail pane)
> use inverse squared fall off : unchecked (it got bright!): I like that look
> change intensity to .2
> attentuation radius: 1024
> I think he is changing work detail lighting settings off screen
> The effect of all this is very subtle: a slight orange tint to lit stream area
> I guess he wants to enhance the lit area a bit
drag a sphere reflection capture into area
> above stream near shield
> influence radius = 512
copy that and move towards end of stream outside radius of first one
copy end of stream one and move it to upper left area
> influence radius = 768 (encompasses prior one)
@ 6:33:15
shrink the far right upper brick a bit
adjust the original light:
> color = blue
> intensity = 500
copy that and move it to the opening on the far left
At this point I have 2 overlapping lights (red Xs on them)
> copy again onto right side
Jist:
orange tint in lit areas
blue tint in dark areas
I added 2 white point lights to lighten up the cave to look like his
Tried in Rift again.
> it looks good but the frame rate is bad.
> reflections of light on the later is annoying too.
> roughness of 1 removes this
A low roughness makes the scene look better overall but those reflections in the water are very annoying in VR.
I think several things are adding to the slowness of this scene:
1. light roughness
2. reflection captures
3. overlapping lights that cause lighting to switch to dynamic
4. distance blur
Once I am finished with this scene I will work on finding the optimum settings for performance.
No comments:
Post a Comment