Sunday, November 3, 2013

24 Hour Lighting

24 Hour Lighting
November 3rd, 2013

Michael Allar did an amazing video tutorial on 24 hour light cycles in UDK. It was based on the work of II Patch. Many thanks for doing that. It was the first time I built a complex material and used matinee. Taking the time to explain how everything worked really helped me out.

I spent the last week slowly implementing it in my spare time in the evenings and finished polishing it tonight. The majority of tutorial revolves around a custom material that does 3 things:
1. customizable horizon gradient
2. Creates a sun that moves based on the position of the primary directional light
3. Swaps the horizon for stars at night

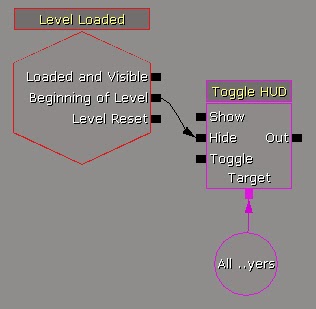
You animate this in Kismet Matinee over a period of time (60 seconds in this example). You can adjust the speed of the Matinee to your liking.

GOTCHAS
There were a few gotchas I encountered along the way, so I thought I'd post them here:

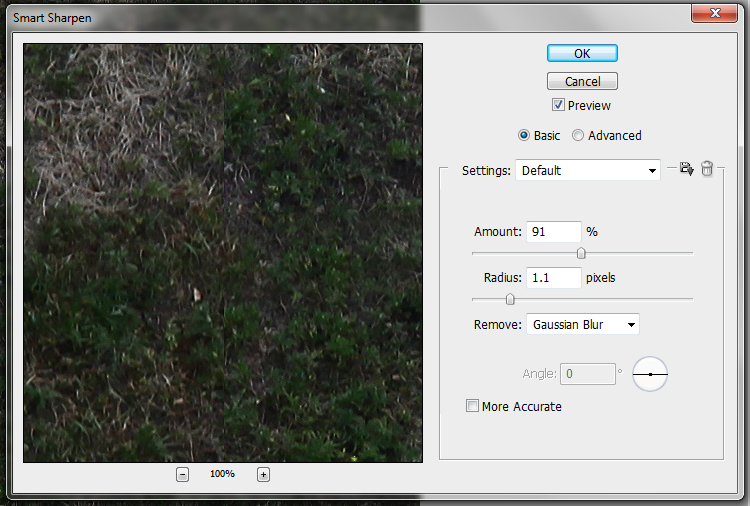
1. Photoshop actually sucks at manipulating stars. I've never had photoshop fail me like it did when I tried to remove stars via layer adjustments. I had to settle on removing them with a clone tool. Never seen anything like it. I got my stars from here:
http://www.peterkutz.com/samples/stars.html

2. If your level was built with a time of day starter that UDK provides you are going to need to tweak a few things:

1. There is a "secret" feature in UDK world properties that includes "extra" ambient lighting. You need to turn that bugger off:
View : World Properties : Lightmass : Use Global Illumination

2. The default fog is not your friend. It will hide your stars. You want to either remove it or turn it way down. I opted to turn it down so that the edge of my map is hidden. Plus it gives my map a "light polution" feel which works well in an urban setting:
Exponential Height Fog : Component : Fog Density : .002

3. When the directional light spins under your map it will still illuminate your models. This caused the bottom of my meshes to glow at night and confused the crap out of me for days. I thought I needed to custom bake my level multiple times and use streaming but nope, what I needed to do is turn off the directional light at night. If you follow this tutorial, doing this should be easy for you.

4. The Rift & the moving directional light do not get along well. There are 2 issues here:
a. Do not use DirectX11. The shading will not work properly in the right eye
b. Do not enable shadows from your directional light. They will not work properly in the right eye. I turned off these settings in my directional light (under Light Component section of actor):
Cast Shadows, Cast Dynamic Shadows, Cast Composite Shadow, Affect Composite Shadow Direction

WHAT'S NEXT:
I'm not done with the sky yet. I need to do 3 more things:
1. add moving clouds
2. add a moon
3. allow the player to adjust the time of day with the controller.

The moon is going to be tricky part. It will be moving independently of the sun. They are not opposites of each other like this tutorial sets out to do. The moon should be visible during the day although just barely. I would also like a texture for the moon instead of a bright light. I imagine this is going to take some work because I don't have a clue how to do it without the directional light. I'm sure I'll find a way :)

Monday, October 28, 2013

Invisibility

Invisibility
October 28, 2013

I watched a presentation given by the Oculus team at GDC last week. The emphasis was clearly on framerate and that it is the number one priority for developers.

Well... my focus has been on realism up to this point and my demo is a tad bit on the slow side unless your gaming rig breathes fire. This means I need to reduce the number of meshes on the screen but how do I do that? I can make my demo more and more scaled down or I can hide meshes based on performance/user-preference. I chose the later.

I just coded this last night so it still needs some work, but the initial results were super cool so I thought I'd share how to do it. Well... actually it blew me away. This code was able to hide 3000+ meshes instantaneously. I've never seen a map where you can make large portions of it just disappear. With the rift on it was incredible.

The easiest route is to bind a key to this code. I actually bound 3 keys to hide different meshes but we'll focus on just the "F" key since it is next to the movement keys.

In DefaultInput.ini:
1. Find this line and comment it out (semi colon in front)
;.Bindings=(Name="F",Command="GBA_FeignDeath")
2. Then add this line:
.Bindings=(Name="F",Command="HideStackTrailers")

You will need a class that extends UTPlayerController.uc. I have already covered how to set up a sample set of code for custom footsteps. Read that first if you are unfamiliar with unrealscript. We will have a variable that holds the prior hide/show setting. the function HideMeshes will flip that setting and hide/show all meshes that are of the type you are looking for. In my case I wanted to hide all trailers of a specific type. You will need to change the meshClass to be your mesh.

This solution is based on what I found here:
http://forums.epicgames.com/threads/929887-Hide-Show-Static-Mesh-By-Name

As usual, the example in the forum didn't work but I beat the code into submission :)

Here you go:

Class CustomGamePlayerController extends UTPlayerController;

var bool bHideStackTrailers;

// You will need to change the meshClass to be your mesh.
exec function HideStackTrailers() {
    local StaticMesh meshClass;
    `log("CustomGamePlayerController.HideStackTrailers:---------------------------");
    ClientMessage("HIDING TRAILERS");
     bHideStackTrailers = !bHideStackTrailers;
    meshClass = StaticMesh'ready_player_one.Meshes.trailer_a';
    ToggleStaticMeshActor(meshClass, bHideStackTrailers );
    ClientMessage("FINISHED HIDING TRAILERS");
}

// Note that I also disable/enable the collision for the mesh
function ToggleStaticMeshActor(StaticMesh meshClass, bool hide) {
    local StaticMeshActor actor;
    foreach AllActors(class'StaticMeshActor', actor) {
        if (actor.StaticMeshComponent.StaticMesh == meshClass) {
            actor.SetHidden(hide);
            actor.SetCollision(!hide,!hide,!hide);
        }
    }
}

Sunday, October 27, 2013

Creating a UDK Installer

Creating a UDK Installer
October 27, 2013

Creating an installer for my UDK demo turned out to be a lot more difficult that I imagined.

DirectX9 versus DirectX11
My first confusion was DirectX9/11. The installer only allows you to create a DirectX9 installation but my UDK Editor was running in DirectX11 AND certain foliage meshes would only display properly if I was in DirectX11. If you want force your game to run in directX11 you will need to pass a parameter into the UDK engine (I cover this below).

Configuration files
It turns out there are a 3 different configuration files for same settings. I found myself making configuration changes that would work when I ran Oculus from the editor but wouldn't work in the installation. Because I don't have the time to study all the configuration files/documentation to become a zen master I took the brute force approach of putting my settings in all 3 files for each setting.

Configuration Settings
-------------------------------------------------------------------------------
Automatically load your map
-------------------------------------------------------------------------------
FILES
Engine\Config\BaseEngine.ini
UDKGame\Config\DefaultEngine.ini
UDKGame\Config\UDKEngine.ini

[URL]
Map=map_02_with_stacks.udk
LocalMap=map_02_with_stacks.udk

-------------------------------------------------------------------------------
Exit on escape DefaultInput.ini
-------------------------------------------------------------------------------
FILES
Engine\Config\BaseInput.ini
UDKGame\Config\UDKInput.ini
UDKGame\Config\DefaultInput.ini

[Engine.PlayerInput]
Bindings=(Name="Escape",Command="Exit")

-------------------------------------------------------------------------------
Improved Appearance
-------------------------------------------------------------------------------
FILES
Engine\Config\BaseSystemSettings.ini
UDKGame\Config\UDKSystemSettings.ini
UDKGame\Config\DefaultSystemSettings.ini

[SystemSettings]
MaxAnisotropy   = 4 -> 16
MaxMultiSamples = 1 -> 8 (THIS CAUSES RANDOM COLORED PIXELS : KEEP AT 1)
ResY            = 720 -> 800
ScreenPercentage= 100.000000 -> 150.000000 (200 TURNS 90% OF SCREEN BLACK)
bAllowD3D9MSAA=True

-------------------------------------------------------------------------------
Enabling Oculus Support
https://developer.oculusvr.com/forums/viewtopic.php?f=44&t=2921
-------------------------------------------------------------------------------
FILES
Engine\Config\BaseEngine.ini
UDKGame\Config\DefaultEngine.ini
UDKGame\Config\UDKEngine.ini

[Engine.Stereo3D]
bEnabled=True

Installation Creation

Prerequisite:
Before creating your installation make sure you have fully built your map in the UDK Editor.

UDK Frontend
UDK comes with a tool called "Unreal Frontend". You will use this to create your installation executable. There isn't much you need to do here.

1. You'll want to create a new profile.
2. Select your map
3. In the launch items I added -dx11 to enable DirectX11 when the game comes up.
4. Click start.

Your executable can be found in c:\UDK\UDK-2013-03

Now test out your executable.

Thursday, October 24, 2013

My Setup II

My Setup II

October 24th, 2013

I thought I'd share a quick update of my setup. I have moved into our Tower Room as my office for work and Oculus development. I have Serena shades so that I can open/close all the shade via remote.

Shades open

Shades closed

Tuesday, October 22, 2013

Custom Footstep Sounds in UDK

Custom Footstep Sounds in UDK

October 22nd, 2013

Getting custom footsteps/jump/landing sounds working in UDK is anything but straight forward. I am going to provide you a complete working solution so that you do not have to struggle with this like I did.

First off, all examples I found on the web were incomplete/incorrect. Maybe it is because I am using a beta version of UDK for the Rift but the examples I found did not work. They got me going in the right direction but they didn't work.

Second, there is some weird code under the hood of UDK. Base classes making references to subclasses (that is a big no-no) and returning hardwired values for things.

I will provide code for this tomorrow.

Sound/Texture work

1. Create a sample sound.
I used quack from this website. It will need turned into 16bit/44100 wav.
(see prior blog entry for how to do this)

2. Import the sound into UDK
(see prior blog entry for how to do this)

3. Create a sound cue for the quack.
> right click in content browser and select 'new sound cue'.
> give the sound cue a name and press ok. This will take you into the sound cue editor.
> leave the editor open and return to the content browser
> select your sound (quack) and return to the sound cue editor
> right click in the sound cue editor and select 'SoundNodeWave: quack'
> connect the sound to the speaker and close the editor

4. Create a physical material to hold the "material name" you will associate with quack
> physical materials are special materials that the physx engine can use. In this case we are going to use it to reference the sound cue of the quack footsteps.
> right click in the content browser and select 'new physical material'
> give the physical material a name. I think the naming convention is ph_{name}. ex:ph_quack_material
> The last property is "Physical Material Property". click the blue arrow to the right and pick "UTPhysicalMaterialProperty".
> In the "Material Type" enter the "quack" for the value. This is the entry we will reference in the unrealscript code.

5. Assign the physical material to your "display material"
> Open the material you want to make noise when you walk on it.
> Expand the "Physical Material" section
> In the content browser select your physical material
> Return to the "physical material" of you texture material and assign the physical material by clicking the green arrow to the right of the "Phys Material" entry.
> close the texture material and you are done with the UDK editor part.

At this point you have a texture with the "quack" physical material associated with it. Now we need to get the unrealscript code in place.

UDK unrealscript prepwork

If you have never coded in unrealscript there is a bit of work involved to get your environment setup. There are a lot of tutorials that cover this topic in detail so I will be brief.

1. I recommend you fire up the UDK log when the editor comes up. It just saves you a lot of digging constantly for log files. In your executable shortcut (on the start button and/or desktop) add -log to the end of the executable target. Like this:
C:\UDK\UDK-2013-03\Binaries\UDKLift.exe editor -log
> You can use the log to look for log entries I have added to the custom code such as this:
`log("CustomGame.SetGameType:=========");
> when you watch the log you should see my log entries. If so, you know you are on the right track.

2. You need to add a directory for your custom unrealscript code.
It will code here: C:\UDK\UDK-2013-03\Development\Src\
You will need a name for your project and a classes subdirectory. In the end it will look something like this: C:\UDK\UDK-2013-03\Development\Src\myproject\Classes
> All of your unrealscript custom code will go in that Classes directory

3. We need to let the unreal system know about your custom directory.
> open this is a text editor: UDK\UDKGame\Config\UDKEngine.ini
> In the [UnrealEd.EditorEngine] section add this entry at the bottom:
EditPackages=myproject

Adding code to make it work

We need 4 custom scripts/files to make this work

To make this is as simple as possible I have added them to gist:
https://gist.github.com/3rdfoundation/7149230

Save these files in your Classes directory

Here is a brief overview of the 4 files/classes:

CustomGame.uc :
This is a new Game you are creating. It extends UTGame (a must) and overrides the damn SetGameType method. That was the secret sauce that took me days to sort out.

CustomGamePlayerController.uc
This is a controller for handling activity from the player.

CustomPawn.uc
This represents your player and other spawned characters. This forces the system to use your new sound class.

CustomGameSoundGroup.uc
This is where the magic happens. All of the sound customization you need to do is right here. FootstepSounds, JumpingSounds & LandingSounds are arrays that hold possible sound mappings.
> MaterialType = the value you gave "Material Type" in the physical material in the UDK editor.
> This material type is mapped to a sound cue via this array.

You will need to edit CustomGameSoundGroup.uc. This is where you map the physical material so they make a noise. The line of interest is:
FootstepSounds[11]=(MaterialType=Quack,Sound=SoundCue'myproject.Sounds.quack_cue')

You will need to change the project name to match your project.

Compiling the code

The easiest way to compile the code is to let UDK do it for you. Because UDK knows about your code directory (via UDKEngine.ini change you made), it checks to see if anything in it has changed and needs compiled when it starts.

Restart the UDK editor and it will ask you to recompile the unrealscript. Hopefully you won't have any issues. Close that and restart the UDK editor again

Selecting your game

One of the classes you added is CustomGame. This will now be available to pick from within the UDK editor. Select CustomGame for your level in the menu item View:World-Properties

Add a mesh that uses your texture and walk on it. Voila! You have quacking.

Now you can adjust/add more sounds & physical materials and make them work by adjusting the code in CustomGameSoundGroup.

I know this is a lot of stuff and you may run into difficulties. I didn't feel like taking snapshots of all the steps. It was too much work. If you need help just comment on this blog and I'll do my best to help you you.

I have also referenced this tutorial in the UDK forum. You may want to check there too:
http://forums.epicgames.com/threads/975978-Creating-Custom-Footstep-Sounds-in-UDK

Saturday, October 19, 2013

UDK Sound

UDK Sound

September 19th, 2013

There are 3 types of sound in UDK:
1. Area sound effects
2. Sound effects that are a result of something the player does
3. Ambient Music

In this tutorial I will cover all three of these and explain how to implement them (I am learning as I go here).

CONVERTING SOUND TO WORK WITH UDK

The first thing you need to do is to convert your sound into something UDK can use.

Here are the recommended specs:
1. 16 bit
2. 44100 Hz.
3. wav file

You can find a ton of detail on that here:
http://udn.epicgames.com/Three/AudioSystem.html#Importing%20Sounds

There are a lot of solutions to convert sounds. Since I don't plan to make any money for the time being on what I am building I will use wavepad to covert sound files. It doesn't come with any crapware in the install which is a plus in my book.

1. Install & Open wavepad. You don't need any of the extras.

2. Open the batch converter by selecting Tools : Batch Converter...

3. Add your files/folders

4. I'm not positive this is necessary but I picked "Convert Sample Rate" and make sure it was 44100Hz.

5. Select "convert to file format" and pick ".wav". Then in the format options pick "Custom" and select "44100 Hz, 16bits, Stereo".
6. If you don't want to overwrite the original sound files pick a different folder.
7. Press "Next" and you are done.

IMPORTING SOUND INTO UDK

This is really simple. Just right click in the content browser in UDK and import the sound. You probably want a folder dedicated to sounds within the content browser.

ADDING AREA SOUND INTO YOUR UDK LEVEL

This type of sound is placed in your level and has a radius. You can control the radius, volume and drop off. You just need to drag the sound into your level and then you can adjust it.

For my level a part of it takes place 20+ stories in the air. I wanted the ambient sound of wind blowing at the top 5 stories. This required me to place multiple instances of the wind effect at the top so that no matter where the player went at the top of the level they would hear wind.

TEXTURE SPECIFIC SOUND EFFECTS

If you want a different sound based on where the player is walking the solution requires a bit more effort. There are several parts to doing this right:
1. changing your game type so you can actually hear sound from meshes you walk on
2. hiding the gun & hud (unless you want that stuff)
3. mapping a physical material with mapped sound to your UV material

Special thanks to this forum entry. It covered the gun/hud disable perfectly.
http://forums.epicgames.com/archive/index.php/t-706135.html

Changing your game type:
You need to switch your game type to utgame making it an unreal tournament game. This causes surfaces to generate sound when a player steps on them. 

1. Go to "View : World Properties".

 2. Within "Game Type" change the "Default Game Type" to utgame.

hiding the gun
To hide the gun you give the player no inventory. To hide the hud you need to do a bit of kismet.

1. Go to "View : World Properties" (see above)
2. Within "World Info" check "No Default Inventory For Player"

hiding the hud
1. Open UnrealKismet (the green K icon at the top on UDK)
2. Right click in kismet workspace
3. Select "New Event : Level Loaded".
4. Right click in kismet workspace
5. Select "New Action : Toggle : Toggle HUD"
6. Drag a wire from "Level Loaded : Beginning of Level" to "Toggle HUD : Hide"
7. Right click in kismet workspace
8. Select "New Variable : Player : Player"
9. Drag a wire from "Toggle HUD : Target (bottom)" to "Player"
When you are done it should look like this:


Mapping a physical material with mapped sound to your UV material
Finally, we need to associate a sound emitting physical material with your texture material that is on your mesh. This was a revelation to me. I had no idea there was such a thing as a physical material. This is a material that works with Unreal's PhysX physics engine. In this case the material is recognized by the game to produce a sound.

1. Open your texture material
2. Open the Physical Material section (see below)

3. Find an existing Physical Material for demonstration purposes
To keep things simple lets use a physical material that already exists: ph_metal. Open the content browser, select the UDKGame package and search for metal. Scroll down until you find PM_Metal. Note the PM prefix. This is telling you it is a Physical Material. Select the material
 

4. Click the Green Arrow to the right of the "Phys Material" property and voila. You have a texture material that will emit a metal sound when you walk on it.


Stay tuned for more...

Tuesday, October 15, 2013

The Dreaded Dark Landscape Issue

The Dreaded Dark Landscape Issue


October 15th, 2013

A few weeks ago I discovered that if I use the UDK foliage mode to add meshes to my landscape they turn black when I build lighting. This was when I discovered something called "UV Lightmaps". Not knowing about lightmaps until now was a huge mistake.

A UV Lightmap is a separate UV layer that tells UDK how to calculate lighting for a mesh. What you do is take each surface that shares lighting and separate it in the UV mapping from the other surfaces.

Currently none of my meshes have UV lightmaps. Unfortunately this includes models from Forester.

In this blog entry I will cover what is necessary to create a UV lightmap for a landscape element. I believe Forester is working to resolve the issue but in the meantime I am going to do it by hand for a few of the trees/grass I have.

1. Create your tree/grass in forester and import it into UDK applying the material to the mesh

2. We need to switch over to DirectX9 to create the lightmap otherwise it will error out:

3. Open the tree/grass mesh

4.  Select Mesh : "Generate Unique UVs..." from the menu

5. In the lower right corner you will have a dialog to generate the UV. Make sure you check "Pack UVs only". Click "Apply"

6. If you show the UV channels and go the second one you will have the new lightmap UV.

That's it. Now just do this for each tree/grass from Forester and you are good to go.

When you are all done switch back over to DirectX 11. Otherwise the foliage you add to your landscape will "flicker" or appear/disappear.

Blender Alpha Channel Madness


October 15th, 2013

When I was first learning blender I stumbled into getting alpha channel textures to display in the 3D view in Blender. I continued to use the same starting file / setup so I always get this behavior. Well I have built a new gaming / development computer and had to reinstall Blender on it. I soon discovered that this transparency / alpha channel display was anything but straight forward. It took me several hours to find the "secret sauce" to get this to work.

I found the answer near the bottom of this tutorial:
http://www.katsbits.com/tutorials/blender/scene-view-alpha-transparency.php

Here is the no-nonsense solution:
1. UV map texture onto object (see other tutorials on how to do this)

2. in the "3D View" press N
   > go to "Display" section
   > in shading pick singletexture or multitexture
   > check 'Textured Solid'

3. On the top menu bar change the engine used for rendering to "Blender Game".
   > the default value is "Blender Render"
   > this will enable a "hidden" game settings feature

4. In the "Properties" view select the "material" section/tab
   > go to "Game Settings" section
   > in "Alpha Blend" select "Alpha Blend"
   > if you want double sided uncheck "Backface Culling"

Optional:
5. On the top menu bar change the engine used for rendering back to "Blender Render".

Monday, September 23, 2013

Forester Pro


September 23, 2013

I've spent a lot of time over the last few days building trees in blender using Sapling, texture mapping them and exporting them into UDK. Although the results looked nice, it required a lot of work.

I started digging around and found "Forester Pro". This gem of a program costs $20. You get a bunch of standard trees to start with and can buy additional packs for $10 each. That is dirt cheap considering the cost of 3D studio max stuff.

At first I was skeptical. I figured I wouldn't have the control I needed to get the vertexes down to a reasonable amount. I was wrong.

Within 30 minutes I had created a tree with about 500 faces that imported smoothly into UDK:


In another 15 minutes I had a forest of birch and maple trees I was able to walk around in:


It also automatically generated 2 LOD models and can build in animation. I don't know exactly how to enable the animation or LODs yet but I think with a bit of effort I'll have that nailed down tomorrow.

Saturday, September 21, 2013

Photoshop -> Blender -> UDK Workflow


September 21st, 2013

Over the last few months I've learned a ton about blender and UDK and thought I'd pull it all together in a concise 3 part tutorial series. This series will show you how to take an image you find on the web and work it all the way to the point of an object in UDK. I don't skip any steps in the production of the texture, blender object and UDK material/objects.


This video covers:
1. finding the texture on the web
2. creating the texture in photoshop
3. creating an alpha channel for see-thru windows


This video covers:
1. creating the object in blender
2. mapping the texture onto the object
3. creating a clipping region for the object


This video covers:
1. loading the texture into UDK as a material that uses the alpha channel
2. loading the object into UDK using the material
3. fine tuning the size of the object
4. adding the object into a UDK game and walking around it

Wednesday, September 11, 2013

Creating a seamless texture


September 11th, 2013

If you do any 3D work you will eventually find yourself needing to add your own textures. For these textures to work well in your 3D environment they will need to be seamless. Fortunately this is not difficult to do.

My tutorial does require you to have photoshop. I will try to keep it simple and not skip any steps.

Step 1 : take your photo. This is an image take from the Hennepin Avenue Bridge in Minneapolis. It is surprisingly difficult to find spots to get overhead shots of streets and grass.


I am going to focus on creating a semi-dead grass texture from this image. Here is my selection:


If I expand my image to have 4 copies of it you can see the seam issue. We need to eliminate these seams.


Fortunately Photoshop has the perfect filter for the job. It is called the offset filter. What it does is takes the corner of the image and moves it towards the center.


Our objective is to move the corner exactly into the center. To do this you need to look at the current size of your image and divide it by 2. My image was 1562x1562 pixels. I need to move the corner 781 pixels down and the right.


This shows you what happened:

The center of your image is now the edge and the edges are now running horizontally and vertically into the center. Now you just need to fix the center area to not have a seam and you are good.

We are going to use the clone tool:


Update (July 22nd, 2014): ------------------------------------------
I've built a lot of seamless textures since I did this posting and one thing is very important: Use a hard clone, not a soft/blurred clone. 

Sometimes if the image has a lot of lighting transitions I will cut it down to half size and copy it vertically (transform: flip vertical) and copy it horizontally (transform: flip horizontal). Then you just need to remove the mirrored look to the image which can be a lot easier than fixing the lighting differences.
---------------------------------------------------------------------------

To use the clone tool you press the alt key on top of where you want to clone from (the red circles in this image) and the left click. This will set the clone position. Then click on the area you want to clone onto and you can start cloning. You will need to experiment based on what your seam looks like


Once you are done clone out any obvious noise. In the above image I cloned out those white specs.


I always sharpen my images. The best filter to use is the smart sharpen tool.


The amount and radius will vary based on the size and make up of your image.


To get your texture to work within UDK you need to have the image be square and be a multiple of 2. I picked the closest smaller value from my image size (1024 x 1024). I may not use this size in the final game but I have kept the largest quality image I could.


Here is the final image for you:


Monday, September 9, 2013

Landscaping for UDK


September 9th, 2013

The first part of my level design earlier in the summer went very well. I can pretty much build anything I want in blender, map textures onto it and import it into UDK. It gave me a false sense of progress. Then I started doing landscaping. Yea... that isn't going so well.

I have spent a LOT of time creating a landscape for my level. I have several unique difficulties to overcome:
1. My landscape is next to a highway surrounded by buildings, roads a river, etc... This isn't some woodsy scene that I can cook up a complex texture to resolve. It is urban
2. My scene can be viewed from a height of 22 stories. This means it needs to look realistic from a great height in all directions.
3. The part of my scene the player can walk around in needs to be at least a quarter mile in all directions.

Combine all that together and you have a noob landscaping nightmare.

I am going to detail all the different things I've learned about landscaping. I will likely need to use some of this information in the future and most of it is uber counter-intuitive so I will detail the steps for each approach.

Here are my current approaches:

1. Flat satellite imagery:
Grab the satellite imagery in a several mile radius from my scene, cut them into 2048x2048 squares and map them onto large squares.

plus:
> it looks awesome from 22 stories up, like you are on a plane.

minus:
> it looks horrible close up
> there is no height to the landscape

2. Hand built landscaping height
Take the satellite square where my scene lives and build a landscape that fits it. Not squares but cut terrain to match the image.

plus:
> it looks a lot better

minus:
> clipping is a bitch.
> since the image is not a grid of squares, it inevitably looks crappy in UDK. I tried this several times. Unhappy results every time.

3. Use a height map with blender
I created a height map in photoshop (which I will detail later), shrunk it to 100x100 and used it as a displacement modifier in blender. Then I unwrapped it onto a texture of the satellite square It was based on.

plus:
> This looked pretty darn good.

minus:
> blender can't handle large grids well. Anything over 100x100 made it get very unhappy (slow).
> unwrapping the texture did not go well. Instead of a square grid mapped perfectly onto the texture it becomes a warped area. It is somewhat close but there is no fixing it when you have 10,000 squares.
> when the grid is imported into UDK, certain faces are not rendered. I've seen this before and I can usually correct it but adding additional faces. That isn't possible with a modifier since it is adding the height in code.
> no clipping. Again, that would suck adding manual clipping for landscaping

4. Use UDK's landscape tool
Use a specific size heightmap to import into the UDK landscape tool. Then you add your materials and paint onto the landscape.

plus:
> it has perfect clipping
> Very fast game performance
> High level of detail

minus:
> Does not blend well into surrounding satellite imagery.
> uber large flat landscapes require perfect textures. Mine are seamless but you can still see patterns
> Landscaping provide great detail BUT stuff urban like sidewalks and roads don't really work.
> textures are broken into squares. A diagonal path is going to look blockish

End Analysis:
I think the only viable route is the UDK landscape. I will need to ditch the satellite imagery and dynamically generate homes/streets/trees in the distance.

Saturday, July 20, 2013

Masked textures in UDK


July 20th, 2013

I have been working on my project and discovered that 20,000+ actors/meshes on the map can easily drag performance into the toilet. I am rethinking my models to minimize faces/vertexes. A big piece of the puzzle is masked / see-thru textures.

I had a hell of a lot of trouble getting masking to work properly. I thought I'd document the key bits of the process for reference & anyone else trying to solve this problem. I have photoshop as an image editor. I do a ton of photography and have been using this tool for a long time...

1. I built a sample graffiti cube texture with 2 windows. I cut the window areas out on the texture:

1. [CNTL]-click on the image of the layer. This selects all the pixels on that layer excluding the window cut outs in this case:

3. Click on the Channel tab and click on the alpha-channel button at the bottom. This adds the alpha channel for the windows.


Save your image as a 32 bit Targa (tga). If you save it as 24 bit, the transparency won't work: 

In UDK I imported the texture. I created a material directly from the texture. Here are the settings for the import:

After the import, the material doesn't work for some reason. Open the material, drag the texture around and then click the green checkbox and voila, you have a masked texture.